Battery Charger for Lawn Mower: How to Choose the Right One
Table of Contents
- Battery Charger for Lawn Mower: How to Choose the Right One
You’re not alone if you’ve ever pulled your lawn mower out of storage only to find it completely lifeless. Many homeowners overlook one critical but straightforward tool: a proper battery charger for lawn mower. The correct charger can distinguish between a smooth start and a frustrating afternoon spent jump-starting or replacing your battery.
In this guide, we’ll walk you through everything you need to know—from understanding your battery’s type and specs to choosing a charger that keeps it in peak condition. Whether you use a traditional riding mower or a modern cordless model, getting the charger right means better performance, longer battery life, and fewer breakdowns. Let’s take the guesswork out of lawn mower battery charging and help you make a confident, informed decision.
Know Your Mower Battery First
Before you buy a battery charger for your lawn mower, you need to familiarize yourself with the battery it will charge. Not all batteries are the same, and using the wrong charger can shorten the battery’s life or cause permanent damage. In this section, we’ll help you identify your battery type and understand its essential specs so you can match it with the right charger.
1. Understand Battery Chemistry: Lead-Acid vs Lithium-Ion
The first thing you need to know is the battery’s chemistry. Most lawn mowers use either lead-acid or lithium-ion batteries. Each type has different charging requirements and requires a charger that’s built to match.
Lead-acid batteries are the most common, especially in riding mowers. These include flooded (wet), AGM (Absorbed Glass Mat), and gel variants. They’re affordable and reliable, but they’re also sensitive to overcharging. To protect them, use a charger with a float or maintenance mode. These features keep the battery topped off without pushing it too hard.
Lithium-ion batteries, commonly used in cordless electric mowers, offer lightweight design, fast charging, and longer life. But they also demand precision. You can’t use just any charger—lithium batteries must be charged with a specific unit. Many smart chargers include a lithium setting or auto-detection but always double-check your battery label and charger specs.
Using the wrong type of charger—like charging a lithium battery with a basic lead-acid charger—could damage the cells, reduce performance, or become a safety issue. Always match the charger to your battery’s chemistry, voltage, and amperage.
2. Check Your Battery’s Voltage and Capacity
After you confirm the chemistry, the next step is checking the battery’s voltage and capacity. Most modern riding mowers use 12-volt batteries, but a few older or compact models might use 6-volt ones. This information is usually printed right on the battery label. Check the user manual or contact the manufacturer if you can’t see it.
Battery capacity is measured in amp-hours (Ah). This indicates the amount of energy that the battery is capable of storing. For example, a 35Ah battery can provide 35 amps for one hour. Select one that provides 10% to 20% of the battery’s capacity when choosing a charger. That means a 35Ah battery pairs best with a charger rated between 3.5 and 7 amps.
If your battery doesn’t list an Ah rating, look for Cold Cranking Amps (CCA) or Reserve Capacity (RC) instead. These are often found on older batteries. You can estimate Ah from RC by multiplying it by 0.6. For example, 90 RC equals roughly 54Ah (90 x 0.6).
Matching voltage and amp rating ensures your battery charges fully without overheating or wearing out prematurely. This method also helps your lawn mower battery last longer.
3. Calculate the Right Charger Amperage Automatically
To make things easier, use the calculator below to find the recommended charger output based on your battery’s amp-hour (Ah) rating. This simple tool helps you stay within the 10%–20% rule for safe and efficient charging. Just plug in your battery capacity, and you’ll instantly see the amp range that best fits your lawn mower’s needs. It’s a quick way to avoid guesswork and protect your battery from undercharging or overheating.
Battery Charger Amp Calculator
Match the Charger to the Battery’s Needs
Choosing the correct battery charger for lawn mower isn’t just a matter of convenience—it’s essential for performance, safety, and long-term battery health. Whether powering up before spring or storing your mower through the winter, the charger must match the battery’s voltage, capacity, and purpose. This section explains exactly what to look for, how to match charger specs to your battery, and how to avoid common mistakes that can cost you time, money, and battery lifespan.
1. Voltage Compatibility is Non-Negotiable
Always start with voltage. It’s the baseline for charger-battery compatibility. Most riding mowers today use 12-volt batteries, but a few older or compact models may still rely on 6-volt systems. Charging with the wrong voltage setting can permanently damage your battery.
- If the label says 12V, only use a 12V charger.
- If it says 6V, select that setting on your charger—if it’s available—or use a dedicated 6V unit.
Modern chargers often come with a voltage switch, but it’s your job to ensure it’s correctly set before connecting. Don’t guess. Double-check your battery label or manual. Using the wrong voltage may result in undercharging or, worse, irreversible battery damage.
✅ Pro Tip: Many smart chargers can auto-detect voltage—but always verify before relying on this feature, especially for older batteries or off-brand units.
2. Choose the Right Amperage for Charging
Once the voltage is set, focus on amperage. As a rule of thumb, your charger’s amp rating should be 10% to 20% of your battery’s amp-hour (Ah) capacity. This ensures a safe and efficient charge.
For example:
- A 40Ah battery needs a charger rated between 4 to 8 amps
- A 100Ah battery can handle a 10 to 20 amp charger
Chargers come in two major styles: trickle chargers and smart chargers.
- Trickle chargers provide a slow, steady charge (typically 1–2 amps), making them ideal for maintaining lead-acid batteries during long storage periods. If the charger supports float mode, the batteries can be left connected for weeks.
- Smart chargers are faster and more versatile. They automatically adjust amperage as the battery fills up and shuts off when charging is complete. This reduces the risk of overcharging, which is especially important for lithium-ion batteries, which are more sensitive to improper charging.
⚠️ Be cautious: Overcharging can shorten your battery’s life, while charging too slowly may not recover a deeply discharged battery in time.
3. Know the Difference Between Charging and Maintenance
It’s essential to understand what you need from your charger—charging or maintenance.
- Charging is used to restore a depleted battery to full power. You’ll do this when the mower won’t start or after months of inactivity.
- Maintenance charging, often done through trickle or float modes, keeps the battery topped off over long storage periods. This is especially useful in winter when mowers sit idle in the garage.
Battery Type Considerations:
- Lead-acid batteries (including AGM): Store them fully charged and maintain them with a trickle or float-mode charger through the off-season.
- Lithium-ion batteries: Avoid full charge or complete drain. Store them at around 70%–80% capacity, and use a charger that allows manual monitoring or limited charging cycles.
Proper maintenance can extend your battery’s service life by several seasons, saving you money and hassle when spring rolls around.
🧰 Need to store your mower for winter? Use a smart charger with float mode or set a reminder to unplug after a partial charge for lithium batteries.
Features That Matter in a Modern Charger
Lawn mower batteries have changed a lot—and so have the chargers that support them. If you’re looking for a battery charger for lawn mower, you can’t just grab the first unit on the shelf. A quality charger should deliver safe, efficient power, extend battery life, and simplify your maintenance routine. Whether maintaining a lead-acid battery over the winter or recharging a lithium unit after use, knowing what features matter helps you choose the right tool.
This section explains today’s most crucial charger technologies and guides you through real-world use cases, including technical specs and practical tips.
1. Manual vs Automatic: What Fits Your Routine
Your charging habits play a big role in determining which type of charger is right for your setup. Let’s take a closer look at how manual and automatic chargers compare and which works better for your mower.
Manual Chargers
Manual chargers give you complete control, which is great if you’re experienced and want to manage the process. They’re typically lower cost and can kickstart older or deeply drained batteries that smart chargers may not detect.
- Best for: Skilled users, vintage batteries, occasional use
- Charging rate: Manually adjustable (often 2A–15A)
- Common drawback: No shut-off; you must monitor and unplug to avoid overcharging
✅ Pro Tip: If you use a manual charger, consider using a plug-in timer to prevent overcharging during long sessions.
Automatic Chargers
Automatic chargers think for you. They detect battery conditions, regulate current, and shut off or switch to float mode once fully charged. This protects battery health and saves time.
- Best for: Regular use, winter storage, lithium-ion or AGM batteries
- Features: Multi-stage charging, auto shut-off, reverse polarity protection
- Ease of use: Plug in and forget—no manual adjustments needed
Most modern lawn mower chargers are automatic—and for good reason. They’re safer, smarter, and work well with today’s more sensitive battery chemistries.
2. Key Safety and Efficiency Functions to Look For
Not all battery chargers for lawn mower units come with the same protections. These safety and performance features separate a reliable charger from a risky one.
2.1. Reverse Polarity Protection
This device protects your battery and charger if the cables are accidentally reversed. It is ideal for preventing sparks or short circuits during setup.
2.2. Automatic Shut-Off / Float Mode
Once charging is complete, the charger stops or switches to a maintenance mode that holds the battery at full charge without damage. This is critical for lead-acid batteries during off-season storage.
2.3. Temperature Compensation
Some chargers automatically adjust voltage based on ambient temperature, ensuring safe charging in hot garages or freezing sheds.
- Cold Weather Example: In winter, the charger boosts voltage to offset sluggish chemical reactions.
- Hot Weather Example: In heat, the voltage drops to avoid overcharging.
2.4. Multi-Stage Charging Algorithms
Modern chargers use 3 to 7 charging stages (bulk, absorption, float, equalization) to optimize battery performance and reduce internal wear. This is especially useful for lithium and deep-cycle lead-acid batteries.
2.5. Short Circuit & Surge Protection
Internal protection mechanisms prevent damage from power spikes or accidental shorts. These safety nets help safeguard both the battery and the charger’s electronics.
2.6. LED or LCD Display Indicators
Clear visual indicators or screens help you monitor charge progress, voltage, and error states. They are helpful for confirming that everything is running smoothly at a glance.
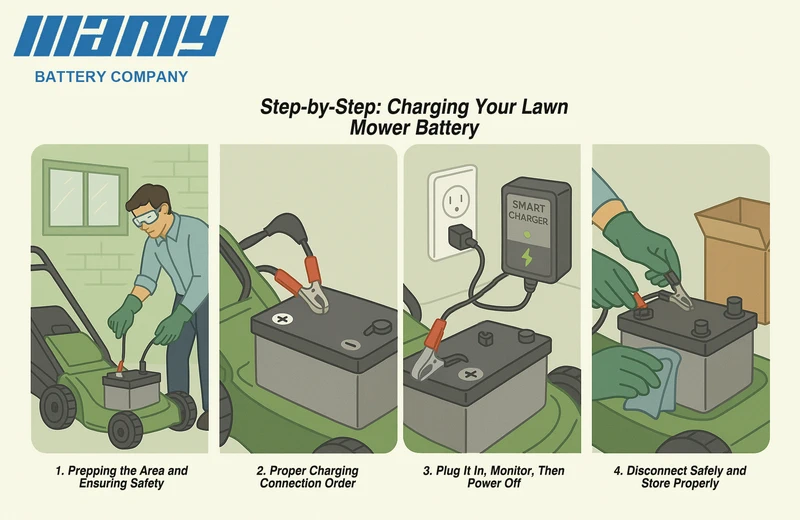
Step-by-Step: Charging Your Lawn Mower Battery
Whether your mower’s been sitting idle for the winter or you’re prepping for a weekend yard project, knowing how to charge your battery the right way is crucial. This step-by-step guide walks you through the process with clear, safe, and effective instructions tailored for beginners and experienced DIYers. Using the right battery charger for lawn mowers not only protects your equipment—it can also extend your battery’s life significantly.
1. Prepping the Area and Ensuring Safety
Start by setting up a safe, well-organized workspace. Choose a well-ventilated area—never charge a battery in a confined space, especially lead-acid models, which can emit flammable hydrogen gas. Keep combustible liquids, open flames, and sparks far from your charging station.
Next, wear protective gear: insulated gloves, safety glasses, and sturdy shoes. Remove jewelry like rings, bracelets, or watches to avoid accidental short circuits. Visually inspect the battery. If it’s swollen, cracked, leaking, or smells strange, do not attempt to charge it—replace it immediately.
If your mower has been sitting in a freezing shed or a sweltering garage, let the battery adjust to room temperature before charging. Extreme temperatures can compromise battery chemistry and safety.
2. Proper Charging Connection Order
Connecting your battery charger for lawn mower in the correct order helps you avoid dangerous sparks and potential short circuits. Identify the terminals:
- Positive terminal: marked with a “+” or red cover
- Negative terminal: marked with a “-“ or black cover
Follow these steps:
- Attach the red (positive) clamp to the battery’s positive terminal.
- Attach the black (negative) clamp to the negative terminal or, if your manufacturer specifies otherwise, to an unpainted metal part of the mower frame.
This method grounds the circuit and minimizes the risk of electrical discharge around the battery.
3. Plug It In, Monitor, Then Power Off
With the clamps secured, plug the charger into a grounded wall outlet. Select the correct voltage—most lawn mower batteries are 12V, but always double-check the label. Older models may still use 6V systems.
Set the charging amperage according to your needs:
- Standard charging: 6–10 amps
- Trickle/maintenance charging: 1–2 amps
Smart chargers are ideal here. They automatically switch modes, prevent overcharging, and often include indicators for charging stage, battery status, or fault detection. Monitor the battery during charging. If it feels hot, swells, or smells like rotten eggs (a sign of venting gas in lead-acid batteries), stop the process immediately and inspect the battery.
When charging is complete, turn off the charger first, then disconnect the clamps. This order prevents residual current from arcing during removal.
4. Disconnect Safely and Store Properly
Always disconnect the clamps in reverse order:
- Start with the black (negative) clamp.
- Then, remove the red (positive) clamp.
Wipe the terminals clean with a dry cloth. If you notice any corrosion—usually a white, crusty buildup—clean it gently using a mix of baking soda and water and a toothbrush. This helps maintain solid terminal contact and prolongs battery life.
Store lithium-ion batteries at 70–80% charge in a cool, dry place. Avoid storing them at full or empty charge for long periods, as both can degrade their chemistry over time.
For lead-acid batteries, if you won’t be using your mower for several weeks or months, leave the battery connected to a smart charger in float or maintenance mode. This keeps the battery charged without overcharging it.
When and How Often to Charge
A healthy lawn mower battery doesn’t just start your engine—it powers an entire yard work season. But if you charge it at the wrong time or let it sit too long, you risk shortening its lifespan. This section explains when to charge, how often, and what tools help you get the most out of every cycle.
1. Seasonal Timing: Before Spring and After Fall
Every spring, you expect your mower to fire up without hesitation. But after months in storage, a drained battery might say otherwise. That’s why late winter (February or March) is the best time to charge your battery before mowing season begins. You’re not just topping off power—you’re preserving the battery’s ability to hold a charge.
The same applies at the end of the mowing season. Before parking your mower in the garage for winter, give the battery one last full charge. This protects lead-acid batteries, which slowly discharge over time. Letting them sit empty can cause sulfation, a chemical buildup that ruins performance. On the other hand, lithium-ion batteries hold charge better but don’t like sitting at 0% or 100%. For lithium, store them at around 75–80% capacity.
2. Watch for Signs of a Low Battery
Your mower won’t always tell you with a warning light—but it will give off signs when the battery’s fading:
- Slow engine cranking or clicking sounds when turning the key
- Requiring multiple jump-starts during the season
- Headlights or indicators (if equipped) appear dim or flicker
- Voltmeter reading under 12.4V on a 12-volt battery
If you spot these issues, don’t wait. Charge the battery immediately using the proper battery charger for your lawn mower, which matches its chemistry and voltage. Early action can save you from a dead battery mid-mow.
3. Use a Smart Charger for Long-Term Storage
Smart chargers, also called maintainers, are the best investment for long-term battery care. They use microprocessors to monitor the battery’s voltage and deliver only the power needed—eliminating overcharging. Most even include a float mode, which maintains full charge without stress.
If you’re storing a lead-acid battery over the winter, leave it connected to a smart charger with float mode. For lithium-ion batteries, charge to 80%, disconnect it and store it in a cool, dry space. These small steps can add years to your battery’s life.
Standard Charging Mistakes to Avoid
Even with the correct battery, the wrong charging habits can lead to costly damage. From mismatched chargers to overlooked corrosion, this section walks you through the most common pitfalls—and how to avoid them.
1. Using the Wrong Charger Type
Not all battery chargers are compatible with every battery type. A generic or outdated charger can harm your battery’s internal components or render it unusable.
For example:
- Charging a lithium-ion battery with a lead-acid charger can result in overvoltage damage.
- Some chargers only support 12V, while older mowers may use 6V systems.
- AGM and GEL batteries often require specific charging profiles.
To avoid compatibility issues, always match:
- Battery voltage (6V or 12V)
- Battery chemistry (lead-acid, AGM, lithium-ion)
- Charger type (manual or smart)
Check your mower manual or battery label. If it doesn’t say, visit the manufacturer’s site or consult a certified dealer.
2. Overcharging with Manual Chargers
Manual chargers operate on a timer or manual disconnect, which makes them risky if left unattended. Unlike smart chargers, they won’t shut off automatically once the battery is full.
Overcharging a sealed lead-acid battery can lead to:
- Boiling electrolyte
- Swelling or case cracking
- Toxic gas leaks
To stay safe:
- Use a timer if you’re using a manual charger.
- Monitor battery temperature—if it feels hot, disconnect immediately.
- Or better yet, upgrade to a smart charger with auto-shutoff.
Overcharging is one of the top reasons batteries fail prematurely—and one of the easiest to avoid.
3. Ignoring Corroded or Loose Connections
Good charging starts with good connections. Dirty or corroded terminals block electricity, causing slow or no charge. Worse, loose clamps can spark, creating a safety hazard.
Before you connect any battery charger for lawn mower, take these steps:
- Check terminals for white or green buildup (signs of corrosion)
- Clean using a baking soda and water paste with a stiff brush
- Dry the area thoroughly before attaching clamps
- Make sure clamps grip tightly—wiggling is a sign of poor contact
A clean, tight connection improves charging and helps maintain the safety and longevity of both the battery and the charger.
Top 6 Best Battery Charger for Lawn Mowers
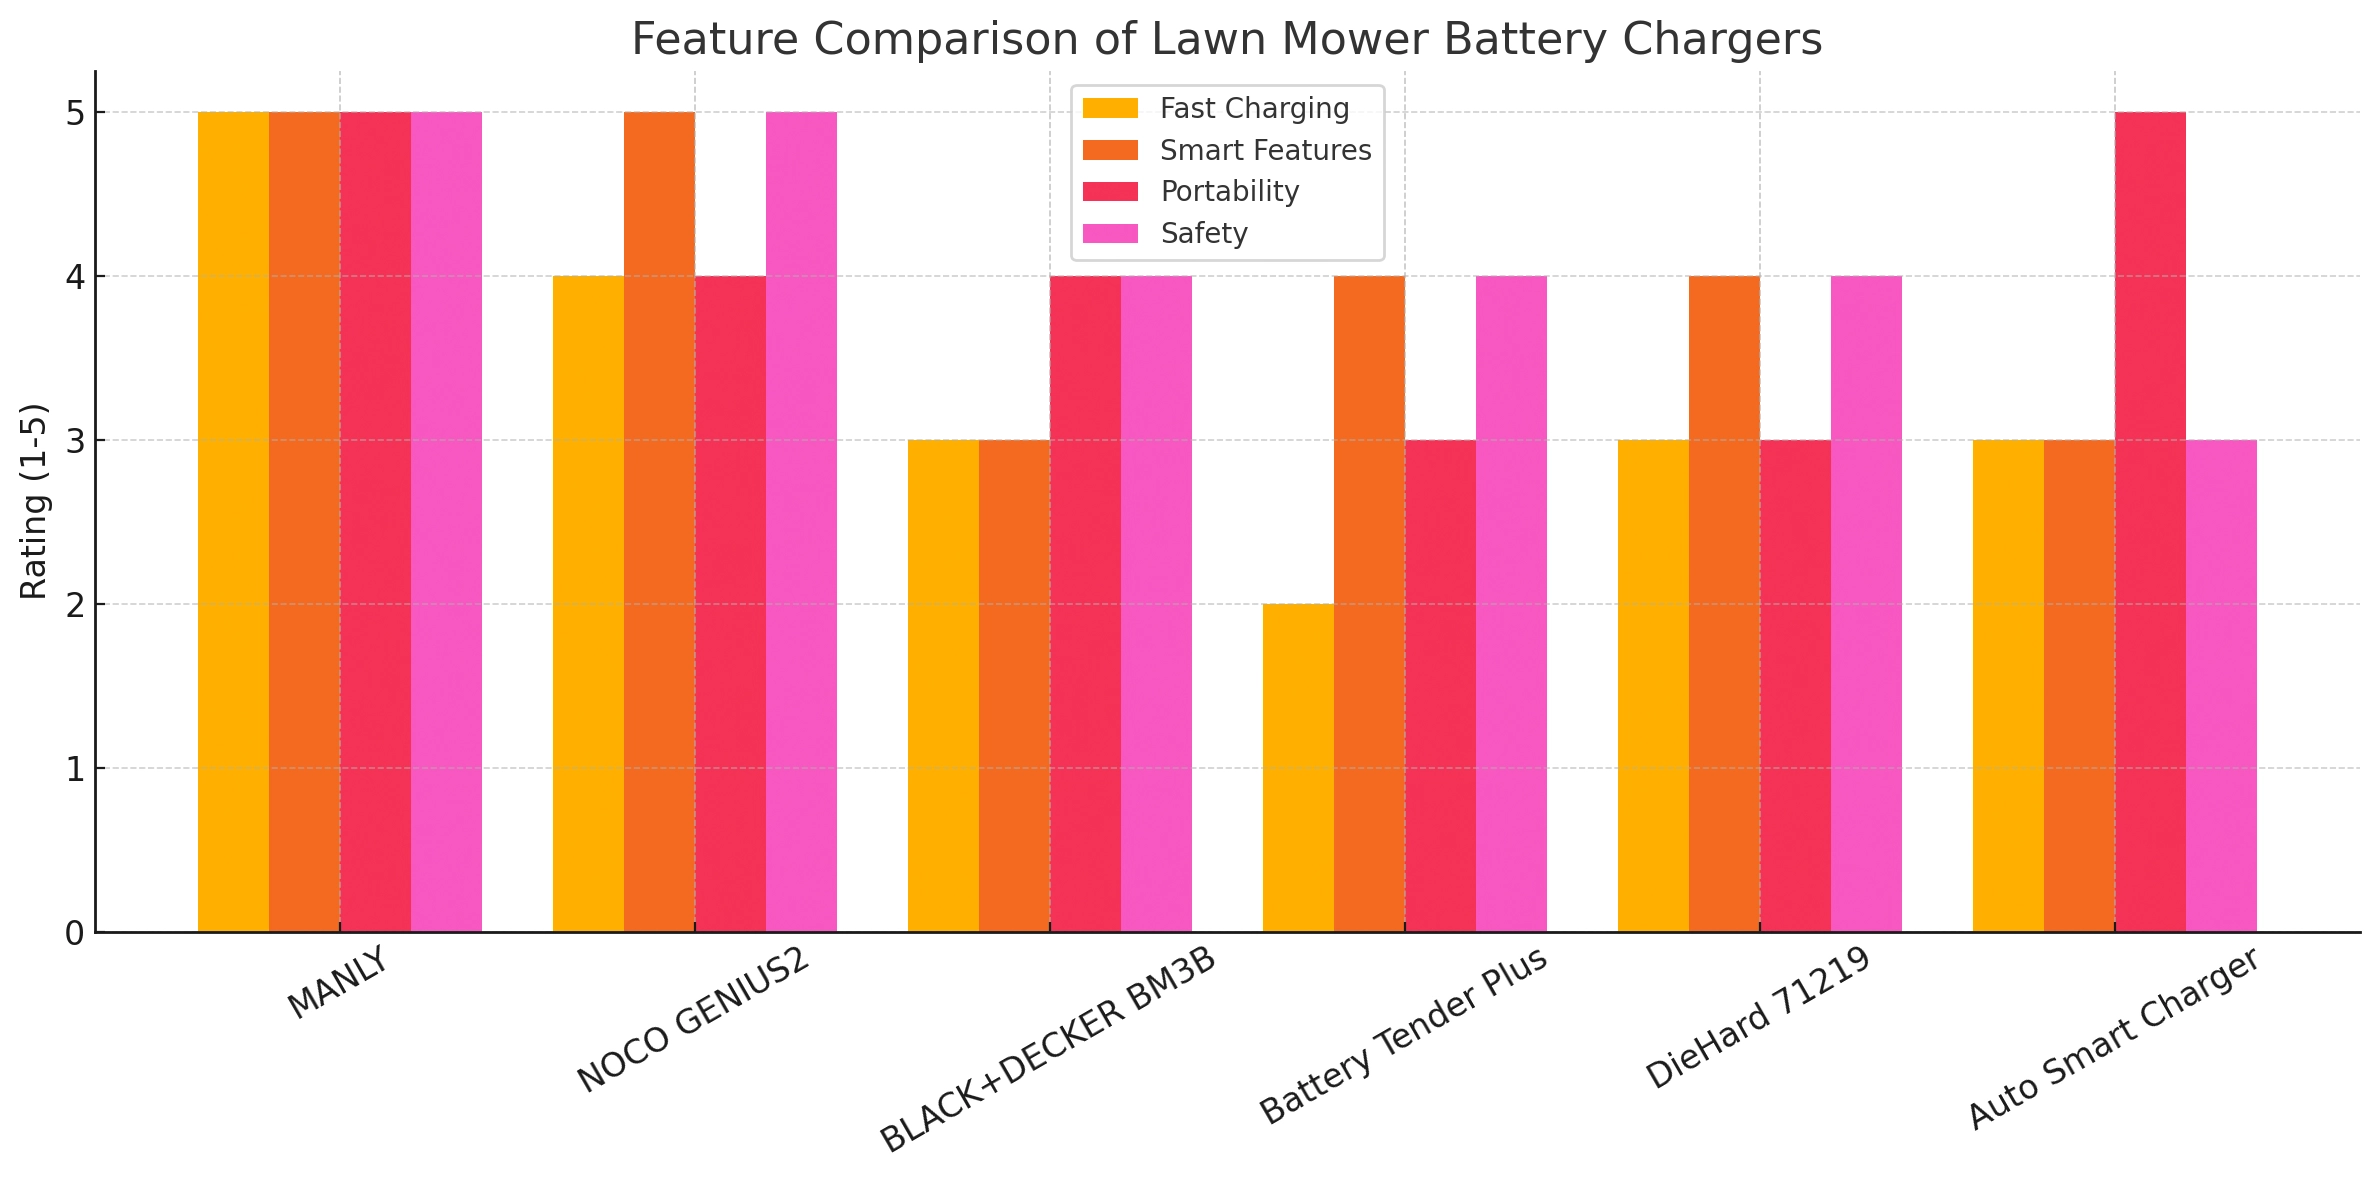
Finding the best battery charger for lawn mower use isn’t just about plugging in and walking away. You need something bright, safe, and built to extend battery life—especially if your mower sits idle during off-seasons. Below are six top-performing chargers that combine performance, protection, and user-friendly design to help you get the most out of your lawn equipment.
MANLY Lawn Mower Battery Charger
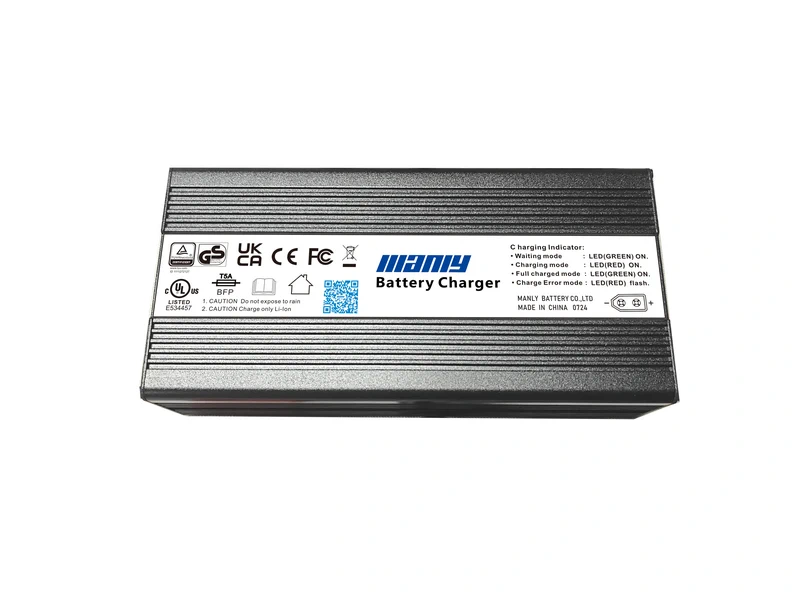
The MANLY charger brings pro-grade features in a compact form. It uses an advanced integrated power module that delivers 20–30% higher efficiency than typical models, reducing energy loss during charging. Thanks to its smart chip, this unit adjusts voltage and current in real time to protect your battery from overcharging, overheating, and short circuits.
Its wide compatibility means you can charge batteries across different brands. The heavy-duty metal housing resists drops and heat while offering top-tier safety with reverse polarity and flame-retardant insulation. With a lifespan of up to five years, this charger is a reliable long-term companion for anyone who wants peace of mind and rapid power delivery.
Pros:
- Fast, smart charging with minimal heat
- Works with a wide range of batteries
- Built-in safety systems (overheat, short circuit, reverse polarity)
- Rugged exterior and compact design
NOCO GENIUS2
Don’t let its size fool you—the NOCO GENIUS2 is a powerhouse. It’s 30% smaller than its predecessor yet delivers over 140% more power, making it a go-to battery charger for lawn mowers. It’s compatible with 6V and 12V lead-acid and lithium batteries, including LiFePO4.
Its precision thermal sensor automatically adjusts voltage based on ambient temperature, avoiding over- or undercharging. The built-in repair mode revives sulfated batteries; the “force mode” can kick a battery down to zero volts. The GENIUS2 isn’t just a charger—it’s a full-time maintainer, desulfator, and guardian.
Pros:
- Compact, high-powered, and temperature-aware
- Works on dead batteries down to 0V
- Maintenance and battery repair modes included
- Easy to use with LED indicators and versatile mounts
BLACK+DECKER BM3B – Fully Automatic and Compact
This unit keeps things simple and efficient. The BLACK+DECKER BM3B is a fully automatic 12V charger that’s small but big on safety. It protects your lawn mower battery from overcharging, short circuits, and reverse polarity.
The LED status lights offer quick visual confirmation, and the compact design makes it ideal for tight garage spaces. This is a great budget-friendly option if you need reliable trickle charging with minimal fuss.
Pros:
- Compact and easy to store
- Built-in circuit protection
- Fully automatic operation
- Excellent value for casual users
Battery Tender Plus 12V 1.25 AMP
A classic in trickle chargers, the Battery Tender Plus adapts to your battery’s needs through a 4-stage charging program. This model is a smart pick for seasonal equipment like lawn mowers, especially when parked during winter months.
It comes with ring terminals and alligator clips, making connection quick and convenient. With a solid metal housing and a 10-year manufacturer’s warranty, this charger earns high marks for long-term use and durability.
Pros:
- Slow, safe, and steady charge
- Durable build quality
- Easy plug-and-play setup
- Ideal for battery maintenance over time
DieHard 71219 – Dual Voltage with Float Mode
If you’re dealing with multiple types of batteries, the DieHard 71219 offers 6V and 12V charging in a single package. Its microprocessor-controlled 5-step charging system ensures accuracy, while “float mode” keeps batteries at the proper voltage after a full charge—great for storage.
It also includes a “desulfation mode” for restoring older batteries. The accessories are a standout feature: clamps, a 12V plug, and permanent ring terminals for easy swaps between vehicles and mowers.
Pros:
- Works with both 6V and 12V batteries
- Advanced charging modes and safety protections
- Float mode for long-term battery health
- Versatile connections for different setups
Automotive Smart Charger – Affordable with LCD Display
This budget-friendly charger earns praise for its user-friendly LCD screen, which clearly shows charging progress and battery condition. It uses pulse charging to prevent battery damage and extend lifespan, while the repair mode targets calcification and other age-related issues.
Its compact design makes it perfect for home garages, and the basic control interface is excellent for beginners or those who want to hook it up and let it run.
Pros:
- LCD interface makes it easy to monitor the status
- Compact, lightweight design
- Built-in repair mode for older batteries
- Affordable with solid performance for the price
Conclusion
Choosing the right battery charger for your lawn mower isn’t just about convenience—it’s about protecting your equipment, extending battery life, and saving yourself from costly replacements. By understanding your battery type, voltage, and capacity and pairing it with a charger that fits those needs, you set yourself up for smooth starts every season.
Modern chargers offer more innovative, safer charging options with float mode, temperature compensation, and automatic shut-off features. Whether prepping for spring or winterizing for storage, the right charger can keep your battery ready without the risk of damage.
Don’t settle for guesswork. Invest in the right charger and follow proper charging habits, and you’ll get more out of your mower—and your battery—year after year.
FAQ
1. What size battery charger do I need for my lawn mower?
To choose the right charger size, match it to your battery’s voltage and capacity. Most lawn mowers use 12V batteries. A good rule is selecting a charger that delivers 10% to 20% of your battery’s amp-hour (Ah) rating. For example, a 35Ah battery works well with a 3.5A–7A charger. Using the correct size helps prevent overcharging and extends battery life.
2. Can you charge a dead lawn mower battery?
Yes, you can usually recharge a dead lawn mower battery—especially if it’s not permanently damaged. Use a smart charger with “recovery” or “force mode” if the battery shows zero volts. If your battery is deeply discharged but still healthy, a trickle or smart charger can return it. However, if the battery is swollen, cracked, or won’t hold a charge after hours, it may need replacing.

